MISSION™ CRISPRa Synergistic Activation Mediator (SAM)
Whole-genome gain-of-function (GOF) screen: Find out what you have been missing
What is CRISPRa and how can it complement your research?
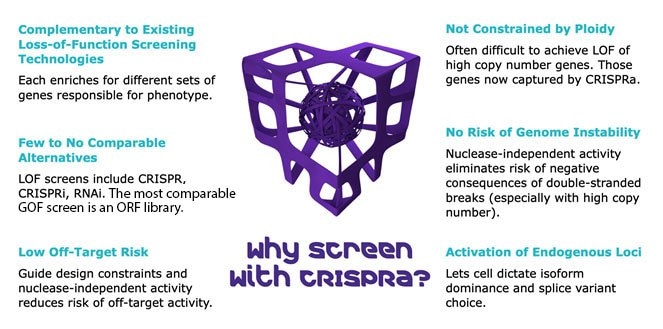
Loss-of-function (LOF) screening is a powerful approach to uncovering gene targets to understand the molecular mechanisms behind health and disease. However, screening the over-expression, or activation, of genes with CRISPR activators (CRISPRa) may reveal additional gene targets for therapeutics and uncover previously unknown molecular mechanisms in disease models. By activating transcription, CRISPRa screening can reveal genes essential in biological pathways or drug resistance.

General Product Description
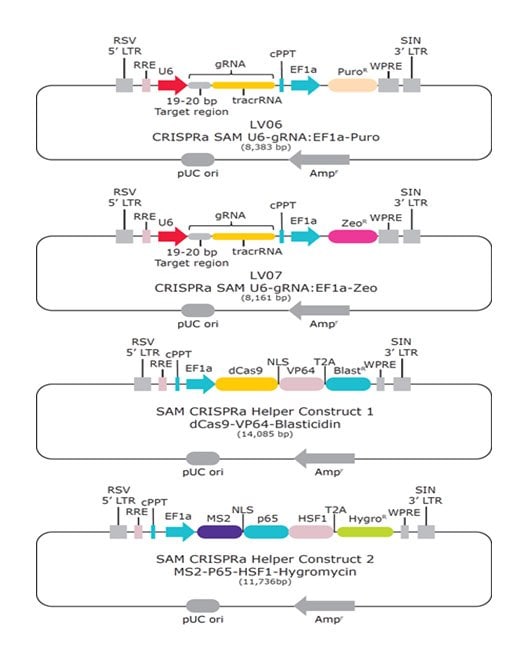
Synergistic Activation Mediators (SAM) are potent transcriptional activation protein complexes (Figure 1). The MISSION™ CRISPRa SAM system (Table 1) uses CRISPR-Cas9-mediated guidance to target SAM components to gene promoters, enabling site-specific transcriptional activation of a gene of interest (8, 10). Each lentiviral component is maintained in the cell under antibiotic selection with dCas9-VP64 conferring blasticidin (blast) resistance, MS2-p65-HSF1 linked to hygromycin (hygro) resistance and gRNA under selection with either puromycin (puro) or phleomycin d1 (zeo). The following shows how CRISPRa screening identifies targets missed in knock-out, knock-down or CRISPRi screens. Using our expertise in library construction and viral production, we deliver a ready-to-use whole genome SAM library optimized for discovery.

Figure 1.Nuclease-dead SpCas9 (dCas9), fused to the transcriptional activator VP64, complexes with the CRISPR guide RNA (gRNA). The stem- and tetra-loop sequences in the gRNA scaffold have been modified into minimal hairpin RNA aptamers, which selectively bind dimerized MS2 bacteriophage coat proteins. MS2 coat protein is fused to the p65 subunit of NF-kappaB and the activation domain of human heat-shock factor 1 (HSF1). The guide RNA contains two aptamers, each capable of binding two MS2 coactivator proteins, effectively recruiting four coactivators for every CRISPR targeting activator complex. The dCas9 and MS2 helper constructs, along with the gRNA, are delivered as three separate plasmids/lentiviral particles.
We have strong core scientific and production capabilities in both genome editing (1, 2, 4, 6, 13) and genetic screening using lentiviral shRNA and whole genome CRISPR libraries (3, 5, 6, 11, 16). These core capabilities have been combined to create new reagents, services, and expertise to support CRISPRa genetic screening. As shown below, we have made improvements that significantly increase the function of the published SAM whole genome library (Figure 2).

Figure 2.Lentivirus quantification by both p24 and CFU assays. Both assays show increased lentiviral titer due to the modifications made by our scientists. Importantly, the functional titer is significantly increased allowing scientists to screen more cells to improve the efficiency and efficacy of their whole genome screen, saving time and budget.
CRISPRa Screening Data
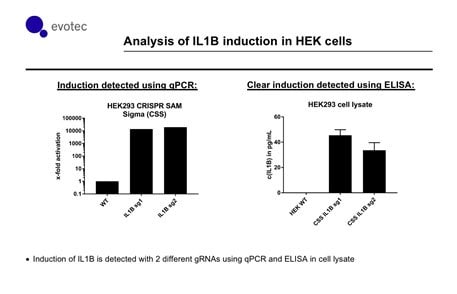
CRISPR technology has revolutionized genome editing by radically simplifying retargeting methods for DNA binding proteins. Since CRISPR systems can be programmed using minimal genetic information (19-20 bp), they are compatible with both delivery of new functional complexes and high-throughput screening methods for drug screening workflows (9, 14, 15). As we show below, the SAM complex can significantly increase the amount of transcript produced compared to endogenous levels (Figure 3). Importantly, an increase in protein levels is also seen in correlation to increased transcript levels.

Figure 3.In collaboration with Evotec, independent scientists show that the SAM system has consistent activation of IL1B (with two different gRNAs targeting upstream of the TSS). qPCR reveals a substantial increase of IL1B transcript relative to control. Importantly, increased transcript level correlates with an increase in protein levels as measured by an ELISA assay.
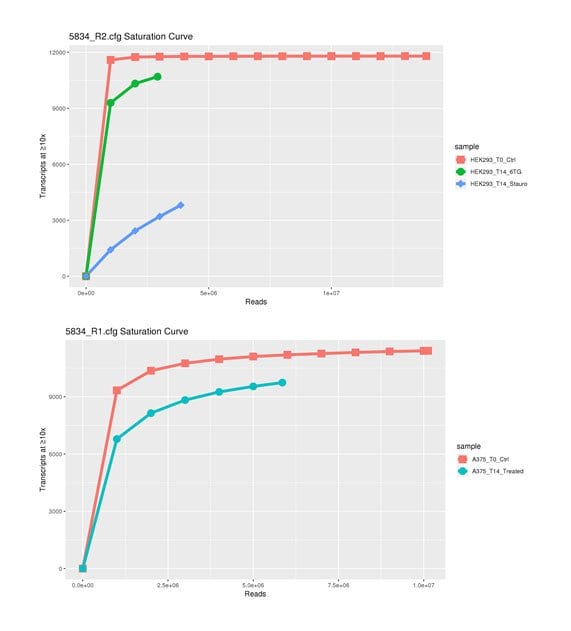
Pooled gRNA libraries contain thousands of individual gRNAs in a single tube. Positive control gRNAs are included in the pools, enabling options for practice screens based on PLX-4032 (or other) drug treatment (Figure 4). In addition, non-targeting (i.e., negative) control gRNAs are included within each pool as a baseline in the statistical characterization of changes in gRNA frequency as measured by deep sequencing. Negative control gRNAs share minimal homology with the target genome and should not undergo significant changes in representation throughout cell treatments. Together, these controls create many options for upfront experimental design and downstream data analysis via MAGeCK, RSA, RIGER, KS-statistics, edgeR, or other methods for qualifying “hits” relevant to drug-gene interactions.

Figure 4.Analysis of several drugs in different cell lines showing the effect of gene activation on cell survival. On the Y-axis is the number of gRNA clones in the library. The X-axis is the number of NGS sequencing reads in millions. As the curve flattens out, there is less unique information found in the library indicating a ‘saturation’ of information in the library.
Considerations for Screening
What are your screening needs? How are you going to be successful? Asking these questions before starting is the key to success. Talk to one of our scientists CRISPR@sial.com to discuss your goals and the screening platform that will work best for you.


Protocols for Lentiviral Transduction and Screening
The protocol for CRISPRa SAM library screening consists of generating stable dCas9+MS2 SAM helper cells, then transducing these cells with the provided lentiviral gRNA library pools, followed by a phenotypic enrichment or selection screen. The genomic DNA (gDNA) is then harvested from selected transduced cells, and guides are PCR amplified for Next Generation Sequencing (NGS) analysis. Guide RNA constructs or lentiviral particles targeting candidate genes, as determined by statistical analysis of screen data, can be custom ordered and transduced to validate screened candidates through phenotypic screening. It is recommended to use cells at low passage number for transduction experiments.
Before starting transduction and screening, users must perform a 7-day kill curve for all required antibiotics in each target cell line and stock used. The user will also need to determine the lentiviral infection rate, or CFU-based titer, for the user’s experimental conditions. This preparatory work should take approximately 2 weeks to complete. The library screen should take roughly 2–4 weeks, depending on cell growth rates. It is recommended to use cells at low passage number for transduction experiments. It is generally recommended to use BSL2 safety guidelines when working with lentivirus. All medium and supplies that have come in contact with lentivirus should be decontaminated with 10 % bleach solution. For an additional lentiviral transduction protocol, Successful Transduction Using Lentivirus.
Preparatory Work
- Perform a 7-day kill curve in each target cell stock for each antibiotic used (Appendix entry A).
- For HSAMPURO-1KT or MSAMPURO-1KT, the sensitivities to puromycin (puro), blasticidin (blast), and hygromycin (hygro) must be determined.
- For HSAMZEO-1KT or MSAMZEO-1KT, the sensitivities to zeo, blast, and hygro must be determined.
- Determine the lentiviral infection rate (CFU/mL) for each target cell type (Appendix entry B).
Generation of Stable dCas9+MS2 SAM Helper Cells
Day 1 - Seeding Cells
- Seed 100k low passage-number cells in fresh medium.
- Incubate at 37 °C with 5 % CO2 for 24 hours.
Day 2 - Transduction
- Remove the medium from each well of the plate(s) prepared on day 1.
- Add 8 µg/mL polybrene-containing medium to each well. Gently swirl the plate to mix.
- Transduce the cells with both helper constructs. Using the equation below, determine the appropriate volume of lentiviral particles for each construct and add to applicable wells. The desired MOI is <0.7. Leave at least one well for selection of non-transduced cells, one well for cells with virus but without selection, and one well for cells without virus or selection agent.

- Incubate at 37 °C with 5 % CO2 for 24 hours.
Day 3 - Medium Change
- Remove the virus-containing medium from each well of the plate(s). Sterilize discarded virus medium and contaminated supplies using a 10 % bleach solution for 24 hours.
- Add fresh growth medium (without polybrene) to each well.
- Incubate at 37 °C with 5 % CO2 for 24 hours.
Day 4 - Dual-Antibiotic Selection
- Remove the medium from each well.
- Feed cells with fresh growth medium containing the appropriate concentrations of blast and hygro, as determined in the kill curves prior to transduction.
Days 5–10 - Continued Antibiotic Selection
- Continue to select for transduced cells using concentrations and timelines based on the kill curves.
- Replace the antibiotic-containing medium as necessary during the selection process (usually every 2 to 3 days). The non-transduced control cells should die completely after 7-day selection with an antibiotic.
- Following selection and subsequent expansion, split selected cells; bank a frozen stock for future culture (Sigma-Aldrich CryoStor® C2874) and grow the rest for transduction with the gRNA library. It is not necessary for selected cells to remain under blast and hygro selection during the gRNA library screen.
Transduction of the gRNA Library
Day 1 - Seeding Cells
- Determine the appropriate number of cells to seed in each well using the equation below. The desired MOI should be <0.1–0.3 to ensure that no cells receive more than one guide. The desired coverage is 300–500x. For example, assuming 24,000 guides per subpool, a coverage of 500x, and a desired MOI of 0.2, you would require 60,000,000 cells for transduction of 1 subpool.

- Seed the appropriate number of cells per well in fresh medium. We recommend seeding enough wells for 2–4 biological replicates per sample from independent library transductions.
- Incubate at 37 °C with 5 % CO2 for 24 hours.
Day 2 - Transduction
- Remove the medium from each well of the plate(s) prepared on day 1.
- Add 8 µg/mL polybrene-containing medium to each well. Gently swirl the plate to mix.
- Using the equation below, determine the appropriate volume of lentiviral particles and add to applicable wells. For example, transduction of this 60,000 cells at an MOI of 0.2 would require 80 µL of virus with a CFU functional titer of 1.5E+08. Be sure to leave some wells as negative controls for selection, and remember to transduce 2–4 biological replicates for each sample.

- Incubate at 37 °C with 5 % CO2 for 24 hours.
Day 3 - Medium Change
- Remove the virus-containing medium from each well of the plate(s).
- Add fresh medium (without polybrene) to each well.
- Incubate at 37 °C with 5 % CO2 for 24 hours.
Day 4 - Antibiotic Selection
- Remove the medium from each well.
- Feed cells with fresh medium containing the appropriate concentration of puromycin or zeo, as determined in the kill curve performed prior to transduction.
Days 5-10 - Continued Antibiotic Selection
- Continue to select for transduced cells using concentrations and timelines based on the kill curve prior to transduction (4 days for puro or 7 days for zeo).
- Replace the puromycin-containing medium as necessary during the selection process (usually every 2 to 3 days). The non-transduced control cells should die completely after 4-day selection with antibiotic.
- Following selection and subsequent expansion, we recommend splitting your cells to bank a frozen stock of selected, transduced cells for future culture (Sigma-Aldrich CryoStor® C2874). We recommend doing this in case you need to restart the experiment.
Day 11 - Enrichment Screen
- Expand cells for at least 3 samples at 300–500x coverage. Harvest one group of cells representing time‑point zero for guide representation (frozen cell pellet is acceptable). The remaining two samples are cultured for your control and experimental conditions. Culture enough cells during each passage to maintain an average guide coverage of 300–500x.
- Perform your enrichment screen using the selection agent or phenotypic assay of your choice.
Harvesting Genomic DNA for Screening Analysis
Harvest your cells for each sample using a GenElute™ Mammalian Genomic DNA Miniprep Kit (Sigma-Aldrich G1N70).
PCR Amplification of Guides for NGS
Nested Amplification is the preferred route for this type of library generation. Direct amplification of the 277 bp product from integrated vector sequence in genomic DNA can lead to many nonspecific bands, often of close size to the real target—this is messy and may lead to wasted reads in the sequencing reaction. Library generation can be accomplished via this method if saving a round of PCR is important to your lab, but it is not our recommended method, and it may require extensive PCR optimization. Additionally, the length and cost of the final PCR primers that include the Illumina flowcell adapters, phase-shifting diversity sequences, and unique barcodes, along with the number of PCR reactions required to consume the harvested unique genomes, would increase the cost of direct amplification step. Therefore, an initial outer PCR should be performed using primers detailed in Table 2.
On both rounds of PCR, cycling should be kept to a minimum. This is an important principle since PCR-introduced errors and biases should be strictly avoided. To increase the yield of low cycle number PCR, multiple PCR reactions should be performed, and the final products combined, purified, and concentrated.
The initial PCR should be conducted on a relatively large mass of genomic DNA. The large mass corresponds to a large copy number of the unique integrated guide RNAs.
Methods
- For all reactions of a single sample, make a single master mix (Table 3, below) including outer PCR primers (Table 2, below), template DNA, and polymerase mix.
- Aliquot reactions into each PCR well and amplify using the cycle conditions detailed in Table 4, below.
- Purify the 370 bp outer PCR amplicons using GenElute™ PCR Clean-Up Kit (Sigma-Aldrich NA1020).
- Perform PCR amplification of the guide cassette from purified genomic DNA adapted from the guidelines outlined in Joung et al., 2017 Nature Protocols (Feng Zhang lab).
- Combine each of the 10 forward diversity primers (Table 5, below) for every sample. (e.g. 95 µL H20 + 0.5 µL each 100 µM fwd primer = 5 µM fwd primer mix).
- For all reactions of a single sample, make a single master mix (Table 7, below), including template DNA, forward primer mix, and corresponding reverse primers (Table 6, below).
- Aliquot reactions into each PCR well and amplify using the conditions detailed in Table 8.
- Purify the 270–280 bp inner PCR amplicons using GenElute™ PCR Clean-Up Kit (Sigma-Aldrich NA1020). Quantify the PCR product and run 2ug of product on a 2 % (wt/vol) agarose gel. Perform gel extraction of the proper band using GenElute™ Gel Extraction Kit (Sigma-Aldrich NA1111). We recommend elution in nuclease-free water (Sigma-Aldrich W4502). Quantify the DNA.
- If using an Illumina Sequencing platform, follow the guidelines established by Illumina and outlined by Joung et al., 2017 Nature Protocols.
Validation of Candidate Genes for Screening Phenotype
Order custom guide RNA constructs or lentiviral particles (Sigma-Aldrich) for each candidate gene or guide RNA to be validated from the ‘top hits’ determined by statistical analysis of your screen data. Give priority to genes that show a similar trend for 2–3 guides per gene. Activation of expression is reported by Konermann et al., 2015 to maximize around 4 days post-transduction.
Day 1 - Seeding Cells
- Seed 100k stable CRISPR SAM helper cells in fresh medium.
- Incubate at 37 °C with 5 % CO2 for 24 hours.
Day 2 - Transduction
- Remove the medium from each well of the plate(s) prepared on day 1.
- Add 8 µg/mL polybrene-containing medium to each well. Gently swirl the plate to mix.
- Transduce the cells with a single guide construct. Using the equation below, determine the appropriate volume of lentiviral particles for each construct and add to applicable wells. The desired MOI is <0.5. Leave at least one well for selection of non-transduced cells, one well for cells with virus but without selection, and one well for cells without virus or selection agent.

- Incubate at 37 °C with 5 % CO2 for 24 hours.
Day 3 - Medium Change
- Remove the virus-containing medium from each well of the plate(s). Sterilize discarded virus medium and contaminated supplies using a 10 % bleach solution for 24 hours.
- Add fresh growth medium (without polybrene) to each well.
- Incubate at 37 °C with 5 % CO2 for 24 hours.
Day 4 - Antibiotic Selection
- Remove the medium from each well.
- Feed cells with fresh growth medium containing the appropriate concentrations of either puro or zeo, as determined in the kill curves prior to transduction.
Days 5 - 10 - Continued Antibiotic Selection
- Continue to select for transduced cells using concentrations and timelines based on the kill curve (4 days for puro or 7 days for zeo).
- Replace the antibiotic-containing medium as necessary during the selection process (usually every 2 to 3 days). The non-transduced control cells should die completely after 4- or 7-day selection with antibiotic.
- Following selection and subsequent expansion, split selected cells; bank a frozen stock for future culture (Sigma-Aldrich CryoStor® C2874) and grow the rest for transduction with the gRNA library. It is not necessary for selected cells to remain under blast and hygro antibiotic selection during validation. Continue culturing cells until enough are present for gene expression or phenotypic analysis.
Days 10+ - Screen Validation
- Subject cells to enrichment screen to validate survival/death/expression/phenotype.
Analysis of Gene Expression
- Harvest total RNA from selected cells using GenElute™ Mammalian Total RNA Miniprep Kit (Sigma-Aldrich RTN70). Again, we recommend elution in water.
- Perform qRT-PCR analysis to determine relative gene expression changes compared to controls, using Quantitative RT-PCR ReadyMix™ (Sigma-Aldrich QR0200).
References
Per continuare a leggere, autenticati o crea un account.
Non hai un Account?