Instructions for EasiCollect™
Product Information sheet
WHAWB120462
Warning
For research use only.
NOT FOR USE IN DIAGNOSTIC PROCEDURES
Introduction
EasiCollect is an all-in-one device for the collection and storage of cheek cells. Cells are captured on the foam applicator by swabbing the inside of both cheeks and then transferred to an Indicating FTA™ Card held within the device.
FTA Cards are treated with a proprietary chemical mix that breaks open cells and releases DNA. The same chemical mix then protects the DNA from biological or environmental damage.
The Indicating FTA Cards also contain a dye that turns white when colourless liquids are applied to the card. This provides an easy method for sample location.
Storage
Store product at room temperature. After applying samples allow the Indicating FTA Card to dry, then store in a multibarrier pouch (WHAWB100036) at room temperature in a dry environment. Dried sample cards can be stored for long periods of time in a multibarrier pouch with a desiccant packet (WHAWB100003).
Helpful hints:
- Always wear gloves when handling biological samples, and avoid touching the surface of the collection device to prevent contamination.
- Sample collection may be improved if subjects avoid eating, drinking or smoking 30 minutes prior to sample collection.
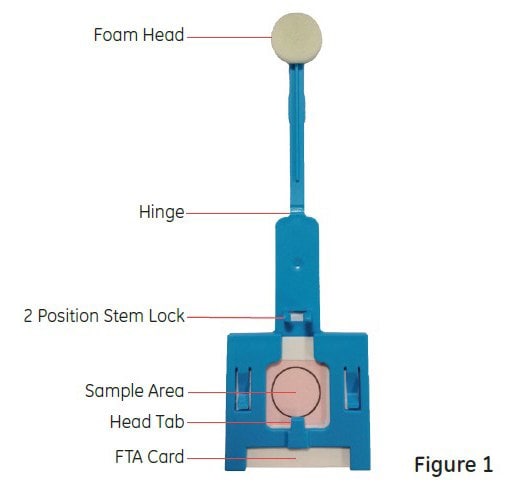
The key features of the EasiCollect device are illustrated in the figure below.
Collection of buccal samples using the EasiCollect Device
Preparation of the device
- Do not open packages before use. When collecting samples always wear gloves.
- Open the protective sleeve at the FTA Card end. Slide out the EasiCollect device leaving the foam-tip in the packaging.
- Record identification information on the back of the FTA Card and then remove completely from the packaging sleeve.
Cheek Cell Collection
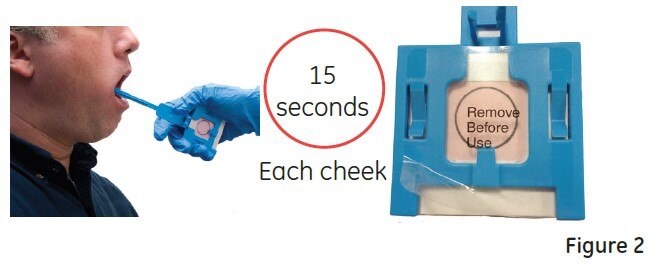
- Hold the EasiCollect as shown (Figure 2). Place the foam head in the mouth and using moderate pressure run it along the gum-line and under the tongue. Once the foam head is wet with saliva, rub the inside of each cheek for 15 seconds. Ensure that you feel/see the cheek protrude slightly during the collection. It is extremely important to ensure that the foam head is coated with saliva during this step to enable good sample transfer.
- Remove the foam head from the mouth.
- Carefully remove the plastic protective film from the FTA Card holder (Figure 2) to expose the FTA Card.
Sample Transfer
- Fold the device at the hinge (1), and press the foam head onto the FTA Card (Figure 3).
- Ensure that the foam head is held in place with the stem lock in the lowest position (2), and the foam head under the head tab (3).
- Leave the foam head in contact with the FTA Card for 10 seconds.

Drying Position
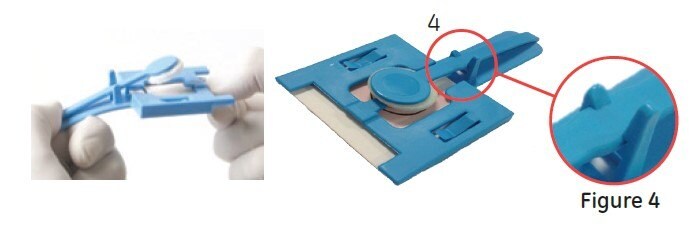
- Release the foam head tab by flexing the device (Figure 4).
- Pull the stem up to the top position on the stem lock (4), removing the foam head from contact with the FTA card.
Note: Prior to shipping of samples it is highly recommended that they be allowed to dry completely. Users will need to determine whether different sample types or volumes or different local conditions will require longer or shorter drying times. For example, the recommended drying time for a whole human blood sample is approximately three hours at room temperature. This period has been determined by following the drying time of 125 μL of whole human blood at 18-22 °C and 60% relative humidity using a sample weight loss method. Do not heat to shorten the drying period. - Allow the sample to dry.
Transfer Check
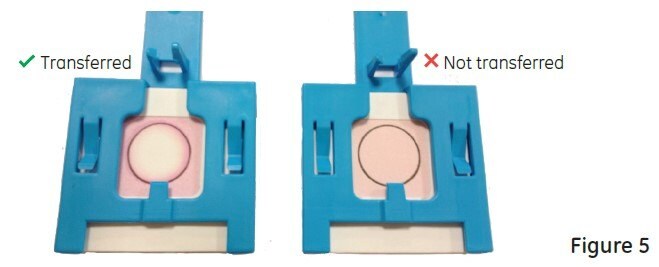
- When dry, check the indicating FTA card and confirm that the colour has changed to white within the sample area (Figure 5).
- If this colour change has not occurred then there may not be sufficient sample transfer, and the sample should be retaken with a new device. Do not repeat sample collection with the same device.
- Sample can then be processed immediately or packaged for transport or storage.
Trouble Shooting Guide
If good sample transfer has not been achieved and a white area has not been produced the following should be reviewed:
- Ensure that the foam head is wetted well with saliva prior to swabbing, as the saliva aids sample transfer.
- Ensure the device is held in the sample transfer position for the full 10 seconds (Figure 6).
Check that both the foam head is underneath the head tab and that the lower stem locking positions are used when the device is in the transfer position. This ensures a consistent amount of pressure is applied across the sampling area.

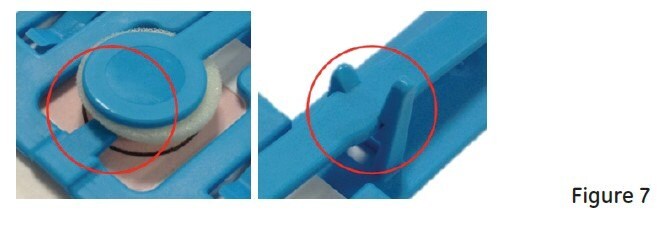
- Ensure the stem lock is in the upper position as shown when drying, and that the foam head has been released fully from underneath the head tab (Figure 7).
FTA Sample Processing
Direct PCR
- Remove a 1.2 mm punch from the dried Indicating FTA Card using a Harris Micro Punch (WHAWB100005), Harris Uni-Core Punch (WHAWB100028) or e-Core™ (WHAWB100052)
- Add PCR reagents to the disk and proceed with the amplification process according to manufacturers’ instructions.
Punch-In PCR
- Remove a 2.0 mm punch from the dried Indicating FTA Card using a Harris Micro Punch™ (WHAWB100007) or Harris Uni-Core™ Punch (WHAWB100029)
- Wash the punched disk with 200 μL FTA Purification Reagent (WHAWB120204) three times for 5 minutes each. Discard the washes:
- Wash the punched disk twice with 200 μL TE-1 buffer (10 mM Tris-HCl, 0.1 mM EDTA, pH 8.0). Discard the washes.
- Add PCR reagents to the disk and proceed with the amplification process according to manufacturers’ instructions.
Legal
GE, imagination at work and GE Monogram are trademarks of General Electric Company.
EasiCollect, e-Core, FTA, Micro-punch, Whatman and Uni-core are trademarks of Cytiva companies.
© 2013 General Electric Company – All rights reserved.
First published January 2013.
All goods and services are sold subject to the terms and conditions of sale of the company within Cytiva which supplies them. A copy of these terms and conditions is available on request. Contact your local Cytiva representative for the most current information
Para seguir leyendo, inicie sesión o cree una cuenta.
¿No tiene una cuenta?